Musicians have always pursued new sounds and ways to alter their tone. In the past century, amplification and pedals have come into play, creating a whole new palette of timbres, tones, attitudes, fuzz, warbles, echoes, snarls and sweetness for guitarists to obsess over in creating their own distinctive sounds.
We can adapt these effects pedals and techniques to create analog sounding synth parts that won’t sound like anyone else. I’ll take you step by step through choosing your pedals, hooking everything up, and integrating them within your DAW of choice.
So, let’s get down to it!
What you’ll need:
- Sound card: First and foremost, you’ll need a a sound card with 1 input and 1 output. We’re going to use the Komplete Audio 6 from Native Instruments, but any good modern card with low latency will work. Effects pedals are mono since they are designed for use with guitars. Don’t see this as a limitation though; you can always add spacial effects like reverb or panning inside your DAW.
- DAW: I’m using Ableton Live 10, but any version of Live 8 or higher will work. The reason I’ve chosen Live for the tutorial is that I’m going to use the “External Audio Effect” bundled plug-in. Logic 9 and higher comes with something similar called “I/O Plug-in.” If you’re a Pro Tools, FL Studio, Bitwig or Studio One fan, share some of your tips in the comments.
- Effects pedals: The fun part! The thing to remember here is that there are no right or wrong pedals. While guitarist have now reached a point of sophistication akin to wine tasting when it comes to tone, at the core it’s still all about experimentation, creativity, trying things out and breaking rules. However, I recommend using one pedal that has tone or EQ controls. This can be handy as some pedals boost the bass or darken the sound, especially analog delays and other non-linear effects such as drive and distortion pedals. Having control of the tone in the effects chain allows you to adjust for these changes. In this example the SansAmp Para Driver takes on this role. While there is some analog magic in the interplay between all the effects pedals outside the box, its is useful to have some tonal control in the middle of all this, but don’t stress if you don’t have a pedal with tone controls at hand. You can fix always use software EQ once you’re back inside your DAW.
- Cables: You’ll need a minimum of 2 for a single pedal, and then one extra for every other effect you want to daisy chain. Don’t splash out on expensive cables – simple guitar cables are totally fine. With the API Tranzformer, I used a high quality balanced cable into the balanced input of the NI Komplete 6, but this was more out of respect for the engineers at API than any perceived fidelity difference!
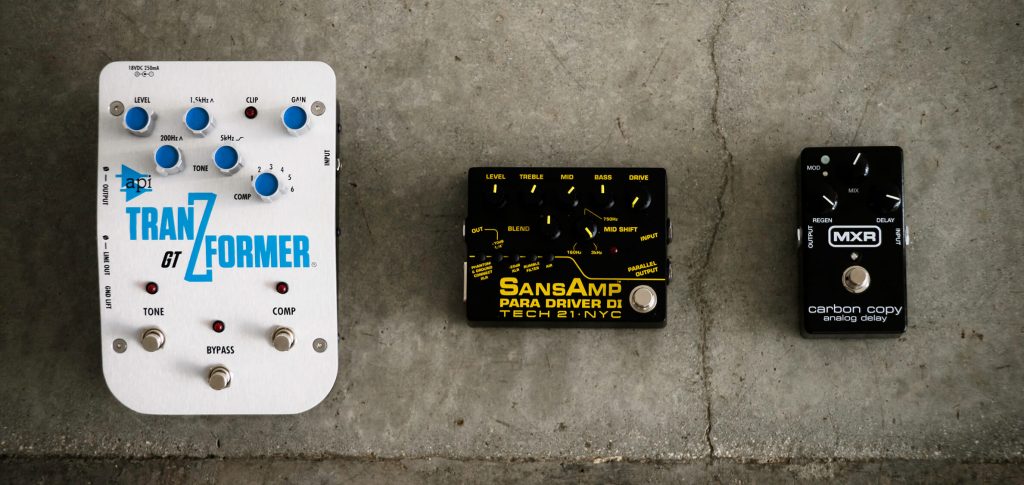
Step 1: Choose your Effects Pedals
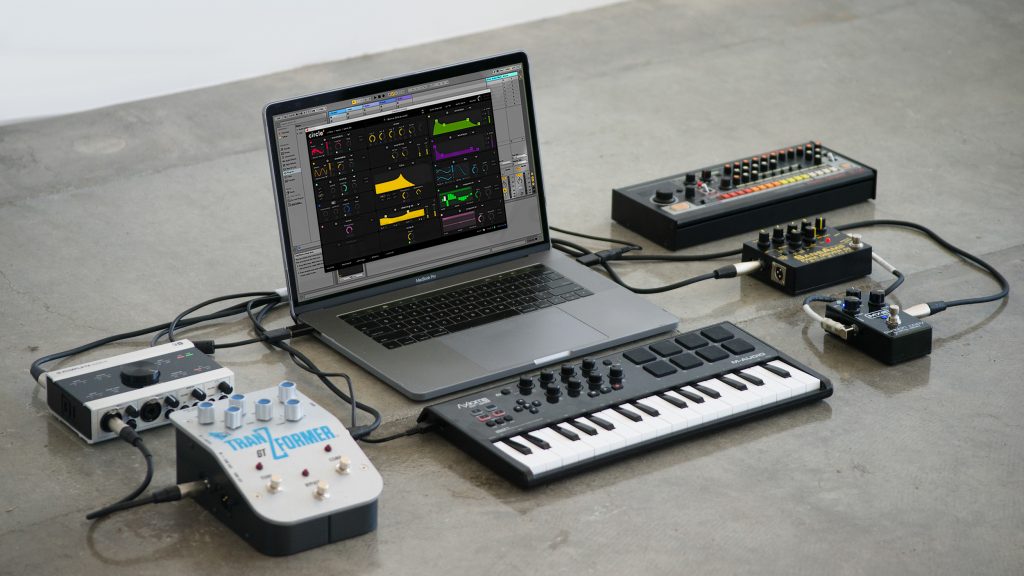
In this tutorial I’m using the API Tranzformer GT, SansAmp Para Driver, and MXR Carbon Copy Analog Delay. Shout out to the guys at Perfect Circuit in Los Angeles for their in-store help. There is still a wealth of expert knowledge out there that’s not a simple Google search away and your local shop can be a great resource.
Tranzformer GT by API: This is a fairly new pedal from API, the makers of highly regarded compressors and EQs. This pedal gives you the sought after API sound for a fraction of the price in an easy to use stomp box. For that alone, it’s worth considering. I used this pedal last in the chain. The compressor keeps everything under control while adding a subtle pumping effect as it works its magic, with the fixed band EQ spicing whatever comes in with that high end API “air.” Check out the recent review from Sound on Sound here. One thing to note is that there are two versions of the Tranzformer: GT and LX. I recommend the GT as the fixed EQ band at 2Khz is a shelving rather than a notch on the LX bass optimized version.
SansAmp Para Driver by Tech 21: The Para Driver is a swiss army knife of a pedal. It gives you a three band EQ, dry/wet control, level boost and drive. I used this right before the Tranzformer. The drive is not too aggressive, adding fuzz style harmonics without overly degrading the sound into heavy metal territory. When combined with the integrated EQ, you’ve got a lot of control over the sound. Circle² creates a wide variety of tones from one preset to another, so this feature definitely comes in handy. Having a pedal with three band EQ built-in is useful to tune up the effects chain as you experiment with different presets and sound design techniques.
Carbon Copy Analog Delay by MXR: The Carbon Copy is an analog delay that uses a bucket brigade delay line. You get three controls: dry/wet, time and feedback. Personally, I love bucket brigade delays. Due to the nature of the circuitry, the delay sound is compressed and low-pass filtered. Adjusting the delay time will pitch up or down the delayed sound, creating a dubby tape-like effect. Another analog delay to check out is the Memory Man by Electro-Harmonix. Thankfully, in the past years these pedals are reducing in price and becoming more accessible as the bucket-brigade chips needed to make them are back in production due to renewed demand.
Step 2: Hook everything up
So now that we have our effects pedals and equipment down, we’ll hook everything up. I’ve put a diagram together below with the inputs and outputs numbered for easy setup.
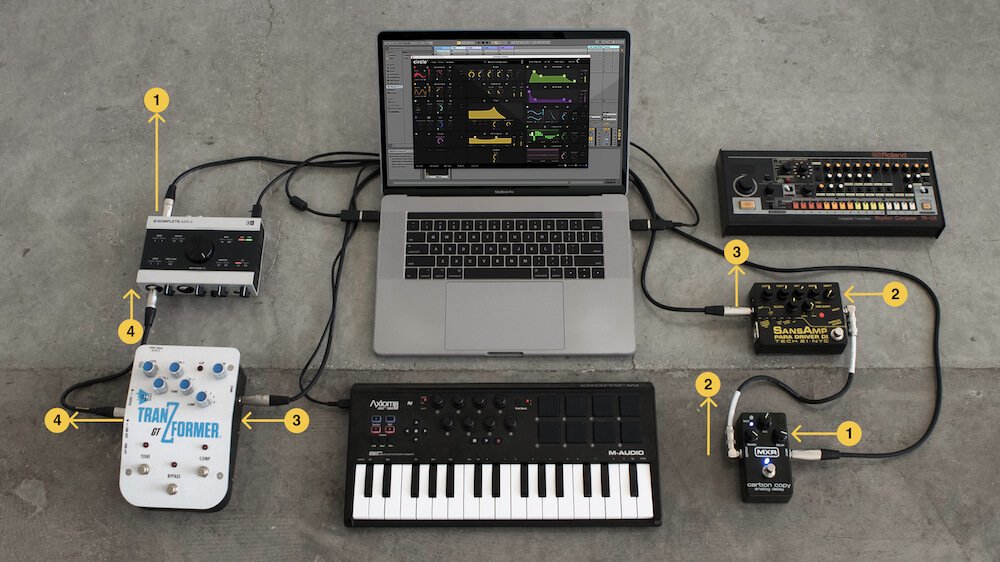
- Take the output of the sound card (I’m using out 4 of the Komplete Audio 6) and run through the input of the MXR Carbon Copy.
- Take the output of MXR Carbon Copy and run it through the input of the SansAmp Para Driver.
- Connect the output of the SansAmp Para Driver and connect to the unbalanced input of the API Tranzformer.
- Using a balanced cable run the output of the API Tranzformer to the input of the sound card. (I’m using Input 1 on the Komplete Audio 6)
The main thing to remember here is that you want to create a loop from the output of the sound card, through the pedals, and back into the sound card again. There is no limit to the number of pedals you can have in a chain, and feel free to mix and match the order to see what works for you.
Once everything is hooked up and turned on, you’re ready to get started in Ableton Live!
Step 3: Setup your Effects Pedals in Live
Launch Live and put an instance of Circle² on a midi track. On this new track use the drop down menu to set “Audio To” to “Sends Only” and set the amount on “Sends A” to full. This means that whatever is played on Circle² goes only to “Send A” and not to the usual default setting of “Master.”
Next, in the left hand side browser of Live find the bundled “External Audio Effect” under “Audio Effects.” Grab an instance and drop it on the “A Return” channel. You’ll see the name of “A Return” will change to “A Ext. Audio Effect”. Now click on channel “A Ext. Audio Effect” and jump down to the plug-in itself on the bottom panel. What we want to do is send audio to Channel 4 of the NI Komplete sound card, through our connected pedal chain, then back in Input 1 of the NI Komplete card.
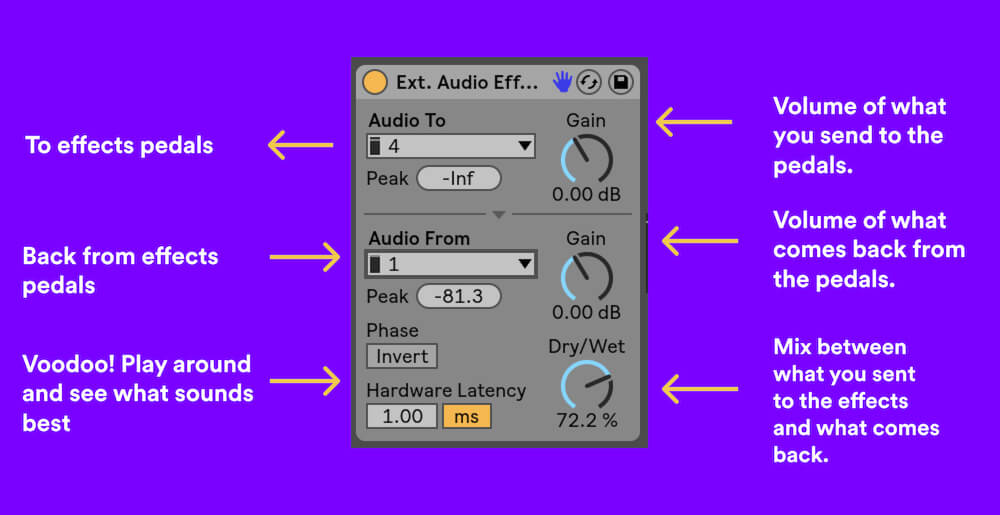
Once you’ve setup the routing to and from the pedals, you can start to experiment with the other settings, which I’ve annotated in the image above. Both the “Phase” and “Hardware Latency,” while conceptually easy to understand after reading Live’s manual, are generally best dealt with in a trial and error fashion. What I found works best is to make sure you’re using the lowest buffer size possible in Live’s main audio card settings and then play around with these two controls and listen to how the settings interplay while you adjust the dry/wet control and experiment with different presets.
Step 4: Experiment
Now you’re ready to start experimenting with your pedals and jamming around. I’ve put together a short video below of our experimentation session. I used Circle² to build a very simple sound using 3 sine waves, 1 triangle, and 4 oscillators each tuned at 8 semi-tone intervals. These simple tones allow the drive of the SansAmp to add clearly audible harmonics to demonstrate exactly what it’s doing. Feel free to go crazy though – there is no right or wrong way – just trust what you like.

If you have any questions or tips on how do this tutorial in another DAW, leave a comment below!