The days of sample packs are upon us. They can be super handy and inspiring when you’re creating a track. But, when you recognize a riser from a sample pack right at the build-up, it can be a mood killer!
The best way around this is to make your own!
I’ll take you step by step through how I created this riser entirely from scratch without using samples.
Once you’ve nailed this technique, start experimenting to create your own technique that you’ll use again and again.
Synthesizing Risers from Scratch
We’ll make this riser using Circle² but you can use this approach in any synth you like. In this recipe we’ll be cooking up 4 Oscillators, Noise, Filtering and FX!
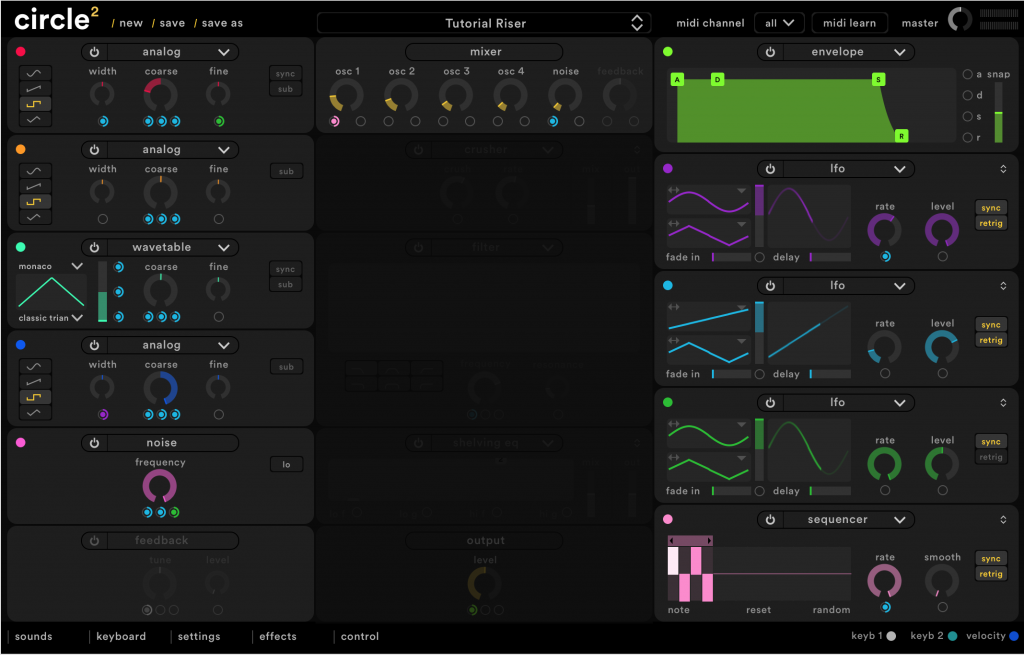
Oscillator 1
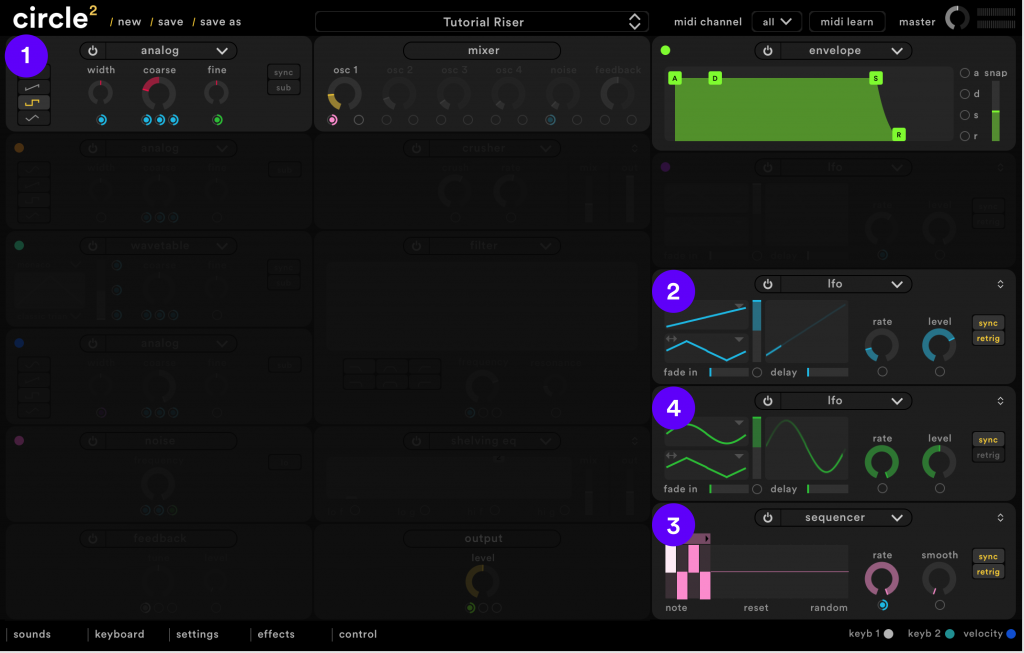
- Hit ‘New’ to initialize the patch. First, turn off the filter and set oscillator 1 mixer level to about 20%. Then, set the amplitude sustain level to 100%.
- Insert an analog oscillator with a square wave setting into oscillator slot 1 and tune to -12 semitones. Remove the Keyb 1 assignment from oscillator 1 coarse tune so the riser isn’t pitch tracked by the keyboard.
- Insert an LFO into modulator slot 3, assigning it to modulate oscillator 1 width and coarse tune (using all 3 modulation slots for coarse). Choose a rising sawtooth LFO and set it to sync and retrig with a rate of 16 bpm, so that the rise lasts for 4 bars.
- Copying the step levels shown in the screenshot, add a sequencer with sync and retrig on, into modulator slot 5. Assign the rising LFO in modulator slot 3 to modulate the sequencer rate, then assign the sequencer to modulate oscillator 1 mixer level.
- Add another LFO into modulator slot 4, with sync on and a rate of 100%. Assign this LFO to modulate the fine tune of oscillator 1, to add some gritty texture to the sound (this uses a technique called FM / frequency modulation).
And this is what Oscillator 1 sounds like:
Oscillator 2
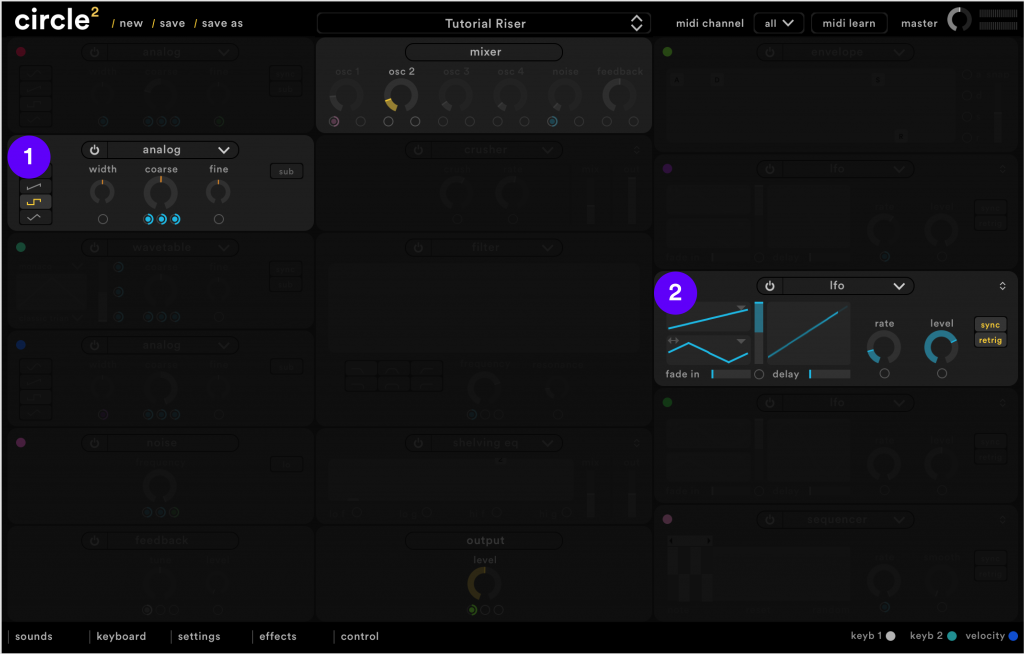
- Turn on Oscillator 2, select an analog oscillator and choose a square wave. Remove the Keyb 1 default modulation assignment from oscillator 1 coarse tune, so the oscillator is not pitch tracked by the keyboard. Set the oscillator 2 mixer level to around 20%.
- Assign the LFO in modulator slot 3 to all 3 modulation slots belonging to oscillator 2 coarse tune, resulting in a tone that gradually rises over 16 bars, each time a note is pressed.
And this is what Oscillator 2 sounds like:
Oscillator 3
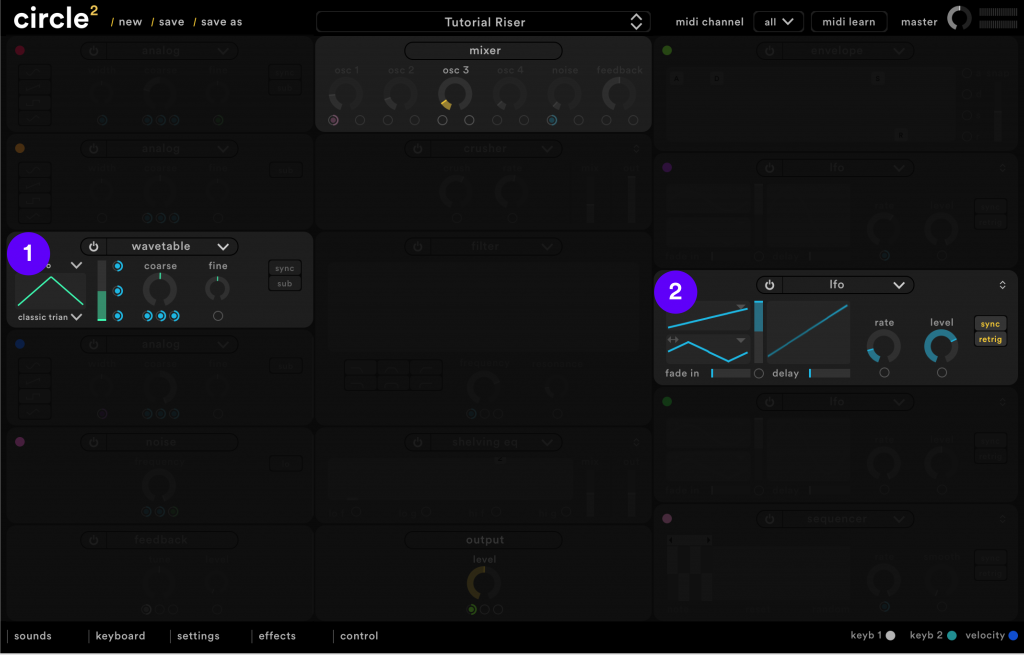
- Turn on Oscillator 3 and insert a wavetable, with a mixer level of around 17%. Insert the wave ‘Monaco’ into the first wavetable selector, again, removing the default Keyb 1 to coarse tune assignment.
- Assign the rising LFO in modulator slot 3 to modulate the coarse tune and wavetable blend of the new wavetable oscillator. Use all three slots for both assignments so that the maximum modulation occurs.
And this is what Oscillator 3 sounds like:
Oscillator 4
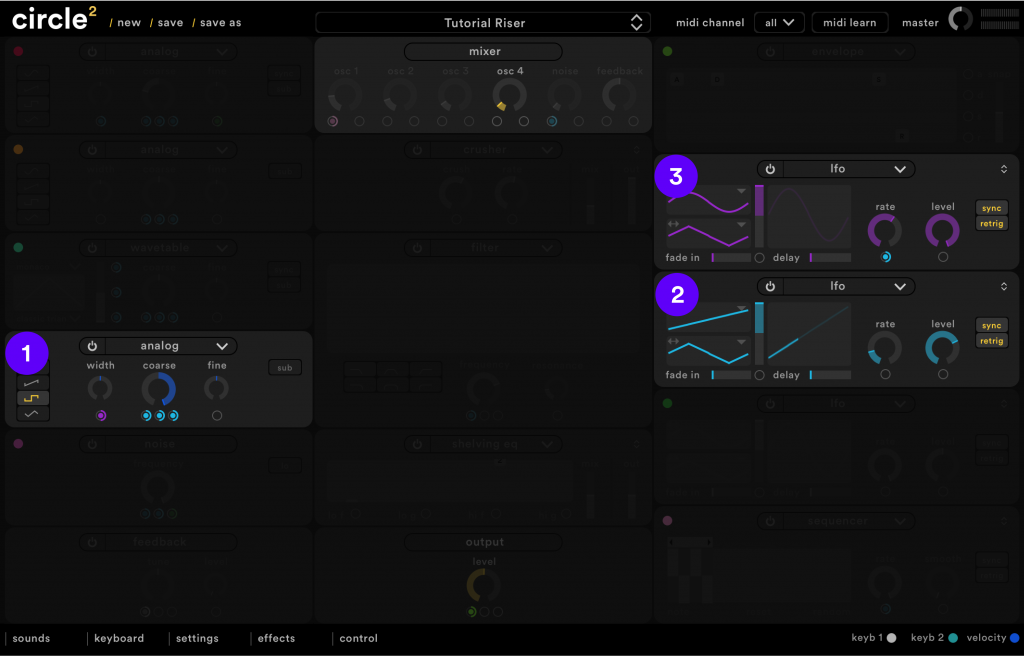
- Turn on oscillator 4 and insert an analog oscillator, tuning it +12 semitones and setting the wave type to square. Remove the Keyb 1 mod circle from coarse tune so the oscillator is not pitch tracked by the keyboard. Set the mixer level to 15%.
- Assign the rising LFO in modulator slot 3 to modulate the coarse tune of the new oscillator, using all 3 available module slots so that the pitch modulation amount is at maximum.
- Turn on modulator slot 2 and insert a sine wave LFO, with sync / retrig on and a rate of 60%. Assign the rising LFO in modulator slot 3 to modulate the rate of the new LFO, then assign the new LFO to modulate the width of oscillator 4.
This is what Oscillator 4 sounds like:
Noise
- Turn on the noise oscillator and set the frequency to 100%. Set the noise mixer level to around 10% so it doesn’t overpower to existing oscillators.
- Assign the rising LFO in modulator slot 3 to the noise mixer level, and also to two of the three noise oscillator frequency modulation slots.
- Assign the fast LFO in modulator slot 4 to modulate the frequency of the noise oscillator, using up the final remaining slot (this gives the noise a crunchy feel using the filter frequency modulation technique).

Here’s what it sounds like:
All Together
So here’s what we’ve got so far; 4 Oscillators and Noise.
Filtering and Main Panel FX
- For some crunchy distortion, turn on and insert a crusher into the pre filter FX slot, setting the crush and rate to 60%, the mix to 30% and the out to 100%.
- Turn on the filter and assign the rising LFO in modulator slot 3 to modulate the filter frequency, so it opens up over time. Set the frequency to 60% and the resonance to 20%.
- Insert a shelving EQ into the post filter FX slot. Bring up the high frequencies using control 2, and bring down the low frequencies using control 1.
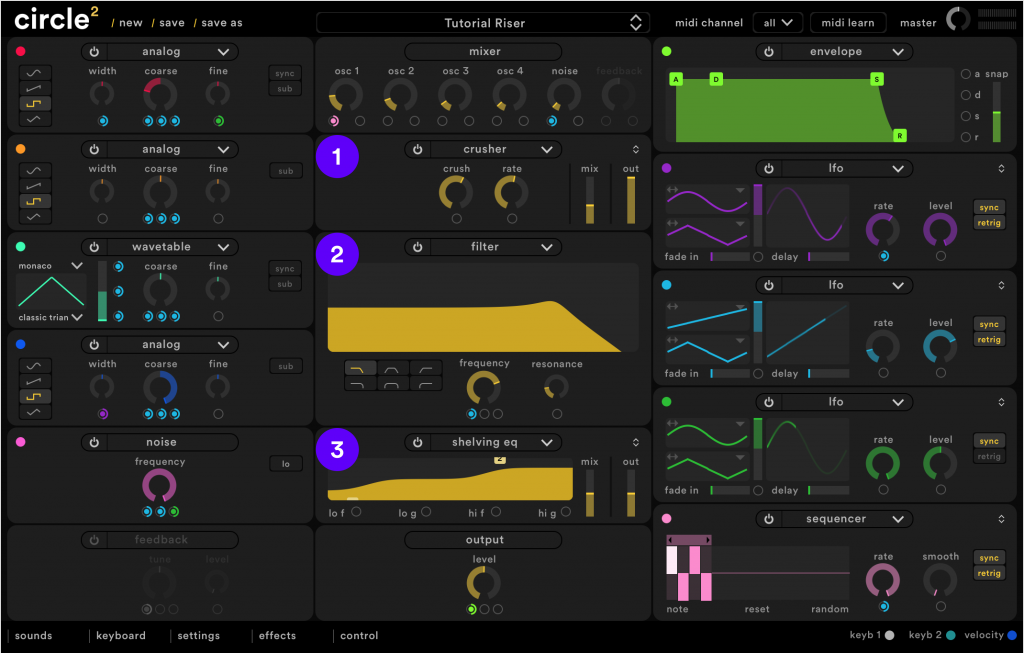
This is what the Main Panel FX and Filter sound like:
Final FX
- Insert a chorus into the first FX slot, giving the sound added texture and stereo content. Set the rate to 50% depth to 25%, mix to 30% and out to 70%.
- Insert a ping pong echo into the second FX slot, to give the sound further stereo width and texture. Set the mix to a subtle 25% and the out to 70%. Experiment with the ping and pong, until you’re happy with the stereo feel.
- Lastly, let’s place the sound into a physical space; Insert a reverb into the third FX slot. The default settings already sound good, but feel free to experiment to your own taste.
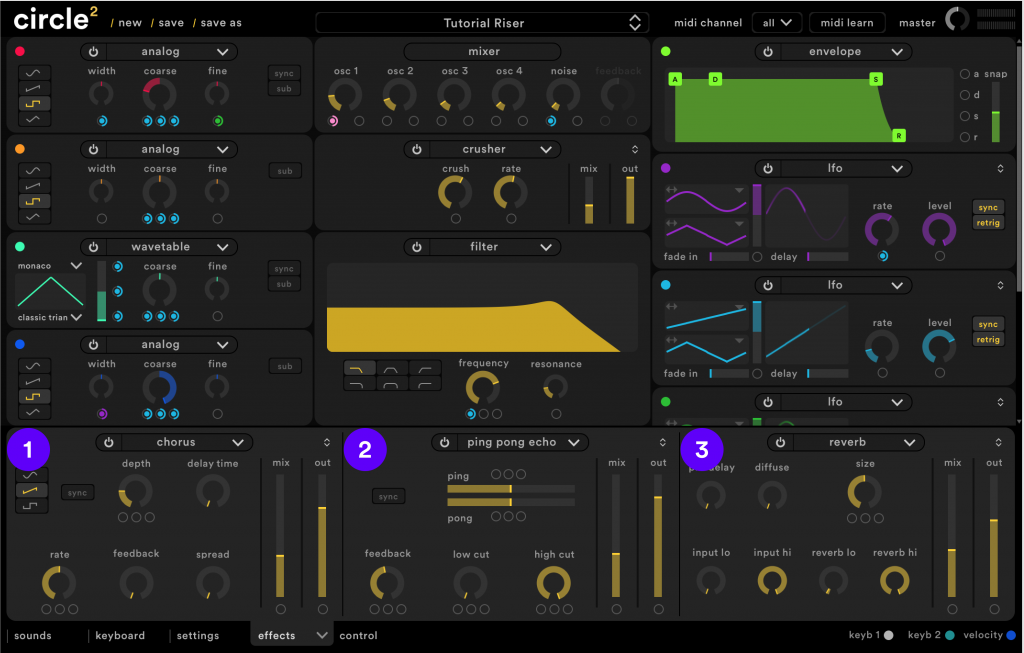
And now our riser is complete! Here’s what it sounds like: